En los tres anteriores artículos hemos repasado cómo crear una contraseña segura y como dificultar que se sepa que usuario es el administrador de tu instalación de WordPress, cómo proteger la carpeta wp-admin y uno de los archivos más críticos, en lo que a seguridad se refiere: wp-config. Así como ciertos plugins que nos pueden servir para realizar estas tareas y las prácticas recomendadas para modificar el prefijo de las tablas de la BBDD de WordPress, cómo desactivar el editor de archivos de WordPress y cómo configurar y modificar los Keys y Salts de seguridad.
Hoy repasaré cuatro accione más para lograr que tu instalación de WordPress sea más segura con cuatro acciones (dos hoy y dos el viernes):
- Añadir cabeceras de seguridad HTTP a nuestro servidor.
- Asignar los permisos adecuados a las carpetas y archivos de nuestro servidor Web.
- Hacer que tu WordPress no parezca un WordPress, y no de pistas.
- Programar un sistema de backups.
Añadir cabeceras de seguridad HTTP a nuestro servidor.
Lo primero de todo, ¿Qué es una cabecera HTTP?
Cuando se produce una comunicación entre un navegador y un servidor Web, ambos se envían una serie de peticiones cuyo resultado final es, o suele ser, el envío del contenido solicitado por el navegador desde el servidor. Entre estas peticiones se encuentran las cabeceras HTTP.
Veámoslo con un ejemplo:
Cuando escribes en la barra de direcciones del navegador, el que sea, una Url, por ejemplo, http://icarlosmd6.sg-host.com/blog/ y pulsas intro, envias al servidor en el que se encuentra hospedada la Web la petición de un contenido determinado. A la vez que envías esa petición, informas al servidor de varias cosas:
1.- El contenido que deseas descargar en tu navegador, en este caso es una página: /blog/.
2.- El host al que le solicitas esta página (carlosmd6.sg-host.com).
3.- El navegador y el sistema operativo que hace la petición.
4.- El idioma en el que está configurado por defecto el navegador.
5.- Si el navegador acepta o no compresión de ficheros en la transmisión y el tipo o tipos de compresión aceptados.
6.- Si existiera, el referrer o referente desde el que viene esa visita.
7.- Si el navegador ya tiene cookie o cookies almacenadas, las enviará al servidor.
8.- La solicitud al servidor de su estado, es decir si está disponible (keep alive).
… etc
Cuando llegan todas estas peticiones, el servidor las responde una a una mediante otra serie de cabeceras y, al final, incluye el código HTML con el que el navegador construirá la página que vemos.
Todo esta información viaja en lo que se denomina cabeceras HTTP y lo hace de forma transparente al usuario que no sabe, y ni falta que le hace en un principio, que esto ocurre.

Si estás algo familiarizados con Google Analytics y con el protocolo de medición que usa para crear las urls que conforman el hit, ahora podrás entender de dónde saca el JavaScript esta información.
Bien, una vez definido lo que es una cabecera HTTP vamos al tajo.
Existen seis cabeceras de seguridad que podemos añadir a cualquier servidor Web, estas cabeceras son:
- X-Frame- Options.
- X-Content-Type-Options.
- X-XSS-Protection.
- Strict-Transport-Security.
- Content-Security-Policy.
- Public-Key-Pins.
X-Frame- Options.
Mediante esta cabecera protegeremos a los usuarios de posibles ataques de clickjaking, es decir que alguien nos cuele un código malicioso en un frame o, por ejemplo un botón de envío. Activando esta cabecera prevenimos que la página pueda ser abierta en un iframe. Los valores que puede tomar son: Deny, Allowfrom y SameOrigin:
DENY: Como su nombre indica, no permite en ningún caso que se ejecute un iFrame.
ALLOWFROM: Permite que se utilice el contenido en las urls que especifiquemos.
SAMEORIGIN: Permite usar el contenido únicamente desde el dominio en el que se encuentra el mismo, no desde ningún otro.
X-Content-Type-Options
Mediante esta cabecera impediremos que un archivo CSS, JS, JPG, PNG… se cargue si su MIME-Type es diferente. Ocurre en muchos casos que los scripts maliciosos se enmascaran dentro de la Web modificando su extensión, por ejemplo si vemos el nombre del archivo llevará una extensión jpg y pensaremos que es una imágen, pero en realidad su contenido es un script en php, o JavaScript que ejecuta el código malicioso.
Para evitar que esto ocurra, bastará con configurar esta cabecera con el valor nosniff. De esta manera se bloqueará la carga de los archivos en los que no coincida su extensión declarada en su MIME-Type con la extensión que muestran. De esta forma, podremos bloquear aquellos archivos que podrían ejecutar código malicioso y que se han introducido en nuestro servidor de forma enmascarada.
X-XSS-Protection
Mediante esta cabecera habilitamos el filtro anti XSS, una capa adicional de seguridad que ya está implementada en los propios navegadores.
Un ataque XSS (Cross-site scripting) se aprovecha de una inseguridad que suelen tener muchas aplicaciones Web, y recordemos que WordPress es una aplicación, para inyectar en las páginas que visita un usuario código en forma de JavaScript u otro lenguaje de programación.
Los valores de esta cabecera son dos: 0 (desactivado) y 1 (activado). Evidentemente emplearemos el valor 1.
Strict-Transport-Security
Mediante esta cabecera podemos implementar HTTP Strict Transport Security (HSTS), un mecanismo de política de seguridad web mediante la cual un servidor web informa a los navegadores que deben interactuar con él únicamente mediante conexiones HTTP seguras (SSL/TLS).
La vulnerabilidad que cubre es el impedir un ataque de extracción de SSL que haría que todas las conexiones seguras se convirtieran en conexiones normales, es decir que las conexiones HTTPS se conviertan en conexiones HTTP.
Content-Security-Policy
Mediante esta cabecera podemos implementar Content Security Policy, un estándar de seguridad que nos permite evitar varios tipos de ataques de inyección de código.
La implementación de este estándar va a depender del entorno en el que trabajemos con nuestra Web. Si este entorno es simple y todos los contenidos los servimos desde el propio servidor, será suficiente con la línea que os dejaré en el ejemplo posteriormente.
Pero si montamos un entorno en que que hacemos uso de CDN (Content Delivery Networks), o tenemos banners servidos por terceros, como puede ser Google AdSense, o usamos Google Fonts que no tenemos en el propio servidor, o Analytics mediante Google Tag Manager… es decir si nuestra Web necesita de terceros para servir el contenido, entonces la cosa se complica un poco y deberemos de generar una cabecera algo más compleja. En este segundo caso podéis generar vuestra cabecera de Content-Security-Policy con CSP is Awesome un generador online que nos ayudará con esta tarea.
Public-Key-Pins
Mediante esta cabecera podremos implementar HTTP Plublic Key Pins (HPKP) un mecanismo de seguridad que sólo será necesario si vuestra Web es HTTPS, es decir si tiene un certificado de seguridad.
La idea es impedir que un atacante altere la cadena de certificación que se genera al visitar un sitio Web seguro y que garantiza que el certificado de seguridad es válido y es el correcto para este dominio.
Mala noticia, para implementar esta cabecera de seguridad es necesario realizar una configuración un tanto compleja que, sinceramente, no controlo. Así que si deseáis hacerlo, echad un ojo a esta presentación de Pablo González y Carmen Torrano o a este documento en inglés.
Añadir las cabeceras de seguridad a WordPress
Vale y ahora, ¿Cómo añado las cabeceras de seguridad a mi WordPress?. La respuesta es muy sencilla: Depende. 🙂
No en serio, como siempre, tienes dos formas, añadir unas líneas a tu archivo functions.php o tu plugin de funciones personalizadas o añadir unas líneas a tu archivo .httaccess. Personalmente me quedaría con la segunda opción, pero a continuación os dejo ambas.
En functions.php o tu plugin de funciones personalizadas deberías añadir lo siguiente. Recordad lo que os dije acerca de las Cabeceras de Seguridad HTTP Content Security Policy:
/* Añadir las cabeceras HTTP de seguridad a WordPress */

function add_security_headers() {

     header( 'X-Frame-Options: SAMEORIGIN' );
     header( 'X-Content-Type-Options: nosniff' );
     header( 'X-XSS-Protection: 1;mode=block' );
     header( 'Strict-Transport-Security: max-age=10886400' );

/* Cabecera de Seguridad HTTP Content Security Policy. Ten en cuenta que esta configuración es correcta únicamente si es tu servidor quien sirve todos los contenidos (css, javascripts, imágenes, etiquetas…) en el caso de no ser así, deberás generar tu propia cabecera personalizada con esta herramienta online http://cspisawesome.com/ */

    header( 'Content-Security-Policy: default-src self' );

add_action( 'send_headers', 'add_security_headers' );
Si optamos por hacerlo desde .httaccess, tendremos que añadir lo siguiente:
# Añadir las cabeceras HTTP de seguridad a WordPress

Header always append X-Frame-Options SAMEORIGIN

Header set X-Content-Type-Options nosniff

Header set X-XSS-Protection "1; mode=block"

Header set Strict-Transport-Security "max-age=10886400; includeSubDomains; preload"

# Cabecera de Seguridad HTTP Content Security Policy. Ten en cuenta que esta configuración es correcta únicamente si es tu servidor quien sirve todos los contenidos (css, javascripts, imágenes, etiquetas…) en el caso de no ser así, deberás generar tu propia cabecera personalizada con esta herramienta online http://cspisawesome.com/ */

Header set Content-Security-Policy "default-src 'self'"
En resumen, mediante la inclusión de estas cabeceras, podremos proteger la comunicación entre nuestro servidor y el navegador que realiza una petición al mismo e impedir que se nos cuelen “bichos” en el servidor o que, en el caso de haberse colado ya, se ejecuten.
Asignar los permisos adecuados a las carpetas y archivos de nuestro servidor Web.
Ya hable algo de esto en el segundo artículo cuando comenté que había que asignar permisos de sólo lectura al archivo wp-config.
Como norma, los permisos de las carpetas de nuestra instalación de WordPress deberían ser 755 y los permisos de los archivos 644. Adicionalmente, para el archivo wp-config, y también para el .httaccess estos permisos deberían estar configurados como 444.
Os estaréis preguntando, ¿Qué demonios significan estos números?
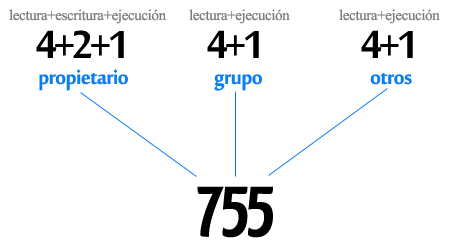
No os voy a aburrir mucho, sólo comentaros que estos permisos se asignan a tres entidades: El propietario o administrador o root, el grupo y el público o visitante. Por eso aparecen tres números.
En cuanto a los valores, se obtienen de la suma de los permisos que tiene cada entidad, siendo los valores únicos los siguientes:
4 – Permiso de lectura.
2 – Permiso de escritura.
1 – Permiso de ejecución.
De esta forma 7, que es igual a 4+2+1, significa que la entidad tiene permiso de lectura escritura y ejecución, 6, que es 4+2, que únicamente tiene permiso de lectura y de escritura, pero no de ejecución, 5 (4+1) es lectura y ejecución y 3 (2+1) escritura y ejecución.
Estos permisos, como ya expliqué cuando hablé de proteger el archivo wp-config, se habilitan desde el FTP de nuestro sitio Web.
No te vayas todavía
Por hoy es suficiente, el próximo será el último de serie de artículos mostrándote cómo hacer que tu WordPress no se anuncie al mundo como tal y como programar un sistema de Backups de tu instalación de WordPress y de su base de datos.


